Showing posts with label autodesk. Show all posts

Friday, March 1, 2013

The Final Outcome

Thesis is finally over and it feels so good to be done! I know everyone is eager to see to the final product, but I'm still tweaking the actual fly through of my scene. I do however, have some wonderful stills of various parts of the train station as it currently is in UDK.

 The Train Tracks with McQuinn above and the giant doors of the Gatehouse ahead.
 A close up of McQuinn's Sign.
 An overhead shot of what the train station looks like.

 A lovely look at the Rasheem Lux and Valheim Station.
 Looking out from the tunnel below Valheim Station.
 The Gatehouse from the ground above the train tracks.
And finally a great shot of the Rasheem Lux storefront and appartments.

There are definitely some things I want to adjust/polish, but I am extremely pleased with how much I was able to get done over the last 22 weeks.  There were a lot of bumps along the way, but I really couldn't have hoped for a better result. I'm hoping to have the fly through and modular breakdown videos up soon!

Wednesday, December 5, 2012

Winter Week 1: Normal Baking Chaos

Fall break is over and after a week of relaxing I came back ready to rock this project. Because I managed to get all of my normal mapping done prior to the break, I was actually a week ahead of my previous schedule. As great as a taking another week off sounds, however, I learned a long time ago never to waste an opportunity to get ahead and stay ahead so I decided to spend the week on several things that I had been putting off instead. Due to various time constraints and tasks that were simply more important, I had put off looking into normal baking. While there where a few things I knew I would have to bake normals for, I wanted to see if baking down high poly smoothed meshes to my low poly geometry was something that would help my project aesthetically or not.
During my research I found that this was not something that everyone included in their workflow, so it wasn't entirely clear to me as to whether it was something I would absolutely need to do or not.
My first problem was that it was a process I knew about, but not one I had ever actually done so it meant I would being doing it for the first time. I watched several videos about transfer maps in maya, but because it is one of those processes that doesn't have a perfect answer (meaning the settings will change almost every time), I took me a long time to get it to work right. At first the transfer maps wouldn't even work. Then they would only pick up half the details. It got to the point where I had wasted about half the week trying to get it to work, and I was about ready to just give up, when I suddenly realized my problem. I was following all these tutorials online, but in all of them the user had their grid at the default Maya size. It occurred to me that because my scene is set up to UDK proportions, and therefore 16x larger than the default, and because I was transferring in world space, that i would need to adjust my max search distance to fit the size of the scene. I still didn't entirely understand the transfer map process, but after asking multiple people for help and still not having any solutions, I decided one last try wouldn't hurt. So I set my max search depth to 16% and crossed my fingers while I waited for the normals to bake. I opened the file, and finally found that it was successful.
Now for my second challenge, deciding if baking down the normals would be possible considering how much time I had left to get my project done. I had to consider how much time it took to set up each piece, bake down the normals, clean up any minor issues, and set them all up in my scene. I spent several hours setting up and baking out different pieces of my scene to get an idea how long it would take. Overall I was spending 1-3 hours on each object depending on it's complexity. With 162 objects in total, it was taking far too long. Had it gone like UVs where I was completing about 5 objects per hour it would've been more do-able, but my unfamiliarity with the process was making me slow, too slow.
Although it already seemed like I was not going to be attempting to bake out each object, I wanted to bring one of the objects into UDK and compare it's appearance to objects without their normals baked. I decided, that if it really made a difference aesthetically, than taking the time to do it could still be worthwhile.
The biggest thing baking high poly to low poly was going to do for me was effect the appearance of transitions between edges/surfaces. The objects that I had baked the high poly to the low poly had much softer and sometimes hardly even noticeable edge transitions. While this was not a back thing for smaller objects, I found that it didn't work well with most of the large objects in my scene and I actually preferred the much harder and sharper look of the non-baked objects. In the end I decided, that baking down the normals via transfer maps in maya was not going to be a worthwhile use of my time.
There were however, several smaller objects in my scene where I would need to bake down geometry. Several of the windows in my scene had details that I felt that could be baked down and done mostly through textures.


There were also several small objects that I just never got around to making last quarter that I wanted to make sure got done before I began texturing. The buildings are supposed to be worn down and even boarded up in some cases, so I wanted to several variations of scrap metal/scrap wood coverings to be placed on some of the windows.


Time Tracking:
1h 00m : Timeline and Planning
0h 33m : Background Building thumbs
2h 27m : Normal Baking
1h 55m : Normal Baking Workflow
3h 00m : Normal Baking
2h 00m : Modeling
0h 30m : Planning Organization
1h 36m : Modeling
2h 02m : Modeling/Normal Baking
2h 44m : Modeling
2h 15m : Modeling

21h 02m Total

Wednesday, November 7, 2012

Fall Week 9: UVs and Exporting

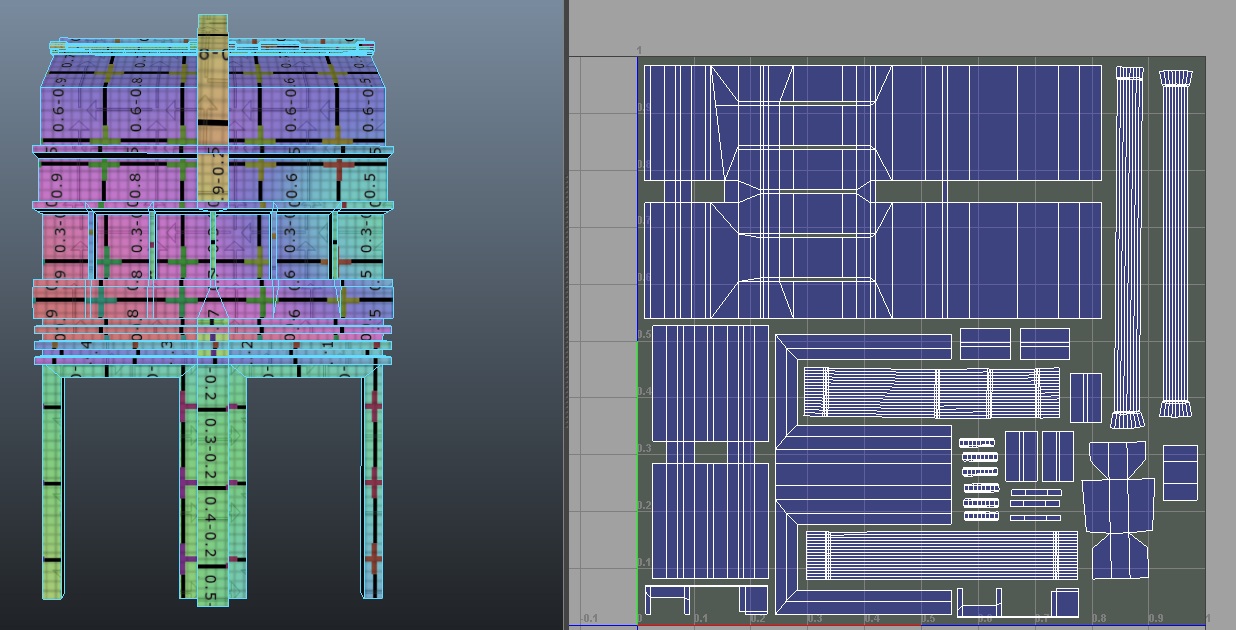
I don't have too many exciting things to show for this week. Most of the work I did involved UVs, which isn't the most exciting thing to look at.  I have also been exporting objects at the same time and slowly building things in UDK. Luckily, I'm very familiar with the UV process and things are actually going better than I was expecting. I have run into an issue with Lighting in UDK however, that I am currently investigating how to fix.

Basically it doesn't want to recognized my UVs for the Lightmaps, so when I bake the lights it looks pretty awful. I've never run into any problems with this before, so I'm not really sure what I am doing differently that is causing them to happen, but hopefully I'll figure it all out soon. There are several ways to fix it, and I'm already going over the options and trying to decided which course of action is the one I want to take. 

Anyways, here're a few of my UV maps that I did this week.


I have UVed 102 objects so far, and have roughly somewhere between 20-50 left. 

And here's a picture of what some of it looks like currently in UDK:

The lights haven't been baked, this is the preview version and so it doesn't look terrible here. 

Other than that, not much else is new. Just a lot of UVing and Exporting, and other than the issue with the light baking, things are going well.

Time Tracking:
4h 15m UV and Exporting
2h 36m UDK Importing and Layout
3h 06m UV and Exporting
7h 00m UV and Exporting
2h 00m UDK Importing and Layout
3h 00m UV and Exporting
1h 15m UDK Importing and Layout
0h 25m Blog Post

23h 37m Total

Tuesday, October 23, 2012

Fall Week 7- Intensive Modeling

Once again I spent the week modeling. I added in a lot more of the details in terms of what I need for the profiles of the various pieces, and overall the scene feels a lot more complete.
I went ahead and took a little bit of time to throw in a quick sun and sky for some nicer renders for this week instead of just using screen shots like I have been. The shadows could be improved, but since my goal is put this in UDK, spending time setting up nice renders in maya, especially this early on, isn't really a good use of my time.
I added trim as well as the details for the side doors and window vents. I'd say I'm about 80-90% done with the base for the train station. There's a lot more pipes I want to work on adding in, but I'm going to be making a small modular set for that. I still need to model the doors.
I added some more architectural detail to the Lux and made some changes to the windows. I'm not sure if all the detail is necessary, but because I still have the old versions of the model it will be easy to scale back a bit if I need to. Aside from the signs and extra decorations I'd like to add, and finishing the doors and store front windows the models for the Lux are pretty much done.
I didn't have too much to change for McQuinn, and other than the doors and any extra decorations it is also done. I played around with making some scrap metal and stuff as covering for closed shops, but I want to wait a little bit before I really delve into making that kind of stuff. Mostly because I need to make sure I plan it carefully enough that I can use it in various places through out the scene. One of the major points of modularity is to reduce the number of unique assets so I want to make sure the boards and other scraps I make can be used effectively.


Of all the buildings, Tepton went through the most changes. I didn't like the feeling I was getting from the design of the side doorways so I changed facade quite a bit. I also modeled the details in the actual gates. If you look below you'll see (aside from the bad shadows I mentioned earlier) that I added in the train tracks as well as a special transitional piece for when the train passes through the actual gate house.

I'm really hoping to push through the last phases of the silhouette pass modeling this week so that I can start putting the level together in UDK and then switch gears to UVing in prepartion for next quarter.

Time Tracking:
0h 30m Gnoman Disk
1h 30m Organization
2h 00m Modeling
6h 00m Modeling
2h 00m Modeling
5h 00m Modeling
2h 00m Modeling
1h 00m Rendering and Set-up
0h 30m Blog

20h 30m Total

Tuesday, October 16, 2012

Fall Week 6: Modeling

Not much to talk about this week, spent the whole time modeling and making adjustments. Got a start on Tepton Gate and continued working on the rest of the buildings.


Time Tracking:
4h 30m Silhouette pass
8h 00m Silhouette pass

20h 30m Total

Sunday, September 16, 2012

Fall Week 2: Conceptualizing, Planning and Research

Concepts:

The majority of my time this week was spent on continuing to conceptualize the different buildings in the scene. Trying to draw and map them out was taking too long since I just don't have enough experience drawing architecture in general, so I decided to just do quick block out models of them instead. It ended up going way faster than trying to draw and gave me a really good sense of the form and space for the different buildings. 

Conceptual block out of the train station.
Conceptual block out of building 3.
Documentation:

I organized my files into a nice little folder set-up so that I can hopefully keep everything neat. Didn't take too much time, but I have had to deal with disorganized project folders before, and the time and frustration is just not worth it so I wanted to make sure I got this done and soon.

I also spent a good bit of time working on the documentation and actual production to-do list. I won't post the whole list, but here's a snippet of what I did:

Production:
UDK:
Test out different Heights for Doors and Windows in UDK
Import Base Meshes to UDK
Block out scene in UDK with Base Meshes
Import Collision Meshes
Test Collision Meshes
Replace Base Meshes with Final Meshes in UDK
Regularly test Proportions and models in UDK
Set up Lighting
Import Textures to UDK
Set up Materials in UDK
Test Materials in UDK
                Set Up Animations in UDK
                                -Train Matinee
                Beta Comments
Assets:
                Train Station
                                Base Meshes
                                Uv’s
                                Textures:
                                                Diffuse
                                                Specular
                                                Normal
                                                AO
                                                Transparency (if needed)
                                Collision Mesh
                                Retopologized meshes (if needed)
                                Final Mesh
                                Rendering:
Asset Break down Sheet
                                                Wireframes
                                                Still Render in UDK
Final Products:
                Capture Footage of UDK Walkthrough of Level
                Still Renders in UDK
                Asset Break down Sheets
                Wireframe Renders
                Process Break-Down Video
                Design Doc

It's still very far from being perfect, but a lot of what I have left to determine will be based on the results of my research so I can't plan it out until that is done.  I don't want to do too much planning before my research is done because a lot of the workflows and over processes I will use are going to be based on what I learn from it. In fact, I began researching today and it is already obvious that I will have to make some major adjustments to the to-do list I put together earlier this week. 

I also managed to write-up a preliminary version of the abstract for the time being. 

Abstract

The purpose of this thesis project is to create a Stand-Alone Game Environment  using modular building techniques that meet and or exceed current industry standard. As a Stand-Alone Game Environment, the final product does not need to include any playable mechanics or require participation from the player. Rather, it is created with the purpose of being an explorable environment that showcases the overall art and assets that make up the environment itself.
The environment itself will be of a worn down train station and boarding zone set in the heart of a once buzzing commerce district of a now aging city. The barely functioning train station is surrounded by decaying apartments and barely-in-business shops.  The shops and apartments are separated by the train tracks which lead from a tunnel into the train station itself.  Above the tracks just outside of the train station is a bridge that civilians may use to cross over the tracks safely from one side to another. The lower level by the tracks and the upper level bridge are connected by special elevators that civilians may use to traverse the scene.
Other visual elements that the environment will feature are detailed textures with normal, diffuse, specular, glow/ambient, and reflection maps. Models will be low poly to allow for optimization in engine, and in some cases sculpted and retopologized. Some interactive elements may include an elevator taking the player to different sections of the map and possibly a matinee Sequence involving a train coming into or leaving the station.
Overall players can expect to experience a well thought out and stylized custom Game Environment that takes place in a unique urban setting.

I expect it to change over time as I flesh out more and more of the design doc and well as continue my research.

Research:
I spent a little bit of time playing around with Trello.com's project planning tools, but in the end I found that it lacked a lot of features that I just felt like without them it wouldn't really be an effective tool for me. I didn't like how you couldn't have a main board showing all your other boards. You could lable them all to be under the same project, but not being able to seem them all at once was a major problem if you wanted to break down the areas of your project into seperate boards. I tried to do something similar in a board where I just broken down the project into notes, but you are extremely limited in how much you can do with a note. I wanted to be able to take a note and break it down into different sections, but again there really just wasn't a way to do it. I spent about an hour trying to figure out how I could organize it so that it would work, before I decided it just wasn't going to be something I could use effectively.

I watched an incredibly helpful video that my professor showed me on the Autodesk Area website by Sandra Tournmille called, "Insider Tips and Tricks for Creating Game Environment Assets." I highly recommend it to anyone who is interested in creating game environments and assets. I'm going to be replanning my overall workflow for this project now because of it.

What was nice about the video was that it was all concepts I had heard of before, but she really goes through and explains what they mean, why they are, and where they play into the production process. Although it was more of a walkthrough to the concepts than an actual tutorial, I found it was really helpful because when watching actual tutorials about the same stuff they don't usually take the time to break things down and explain what they are doing things that way when in relation to everything else that would be going on in a studio. A lot of times in a tutorial, you'll hear "this is important, so do it this way," while the way Sandra does it is, "this is important because the person you pass it onto needs to be able to figure out this from it- which is why it is done this way."

I took about 6 pages of notes from the video, but even so I expect I will be re-watching a lot of it because it really just is that helpful.

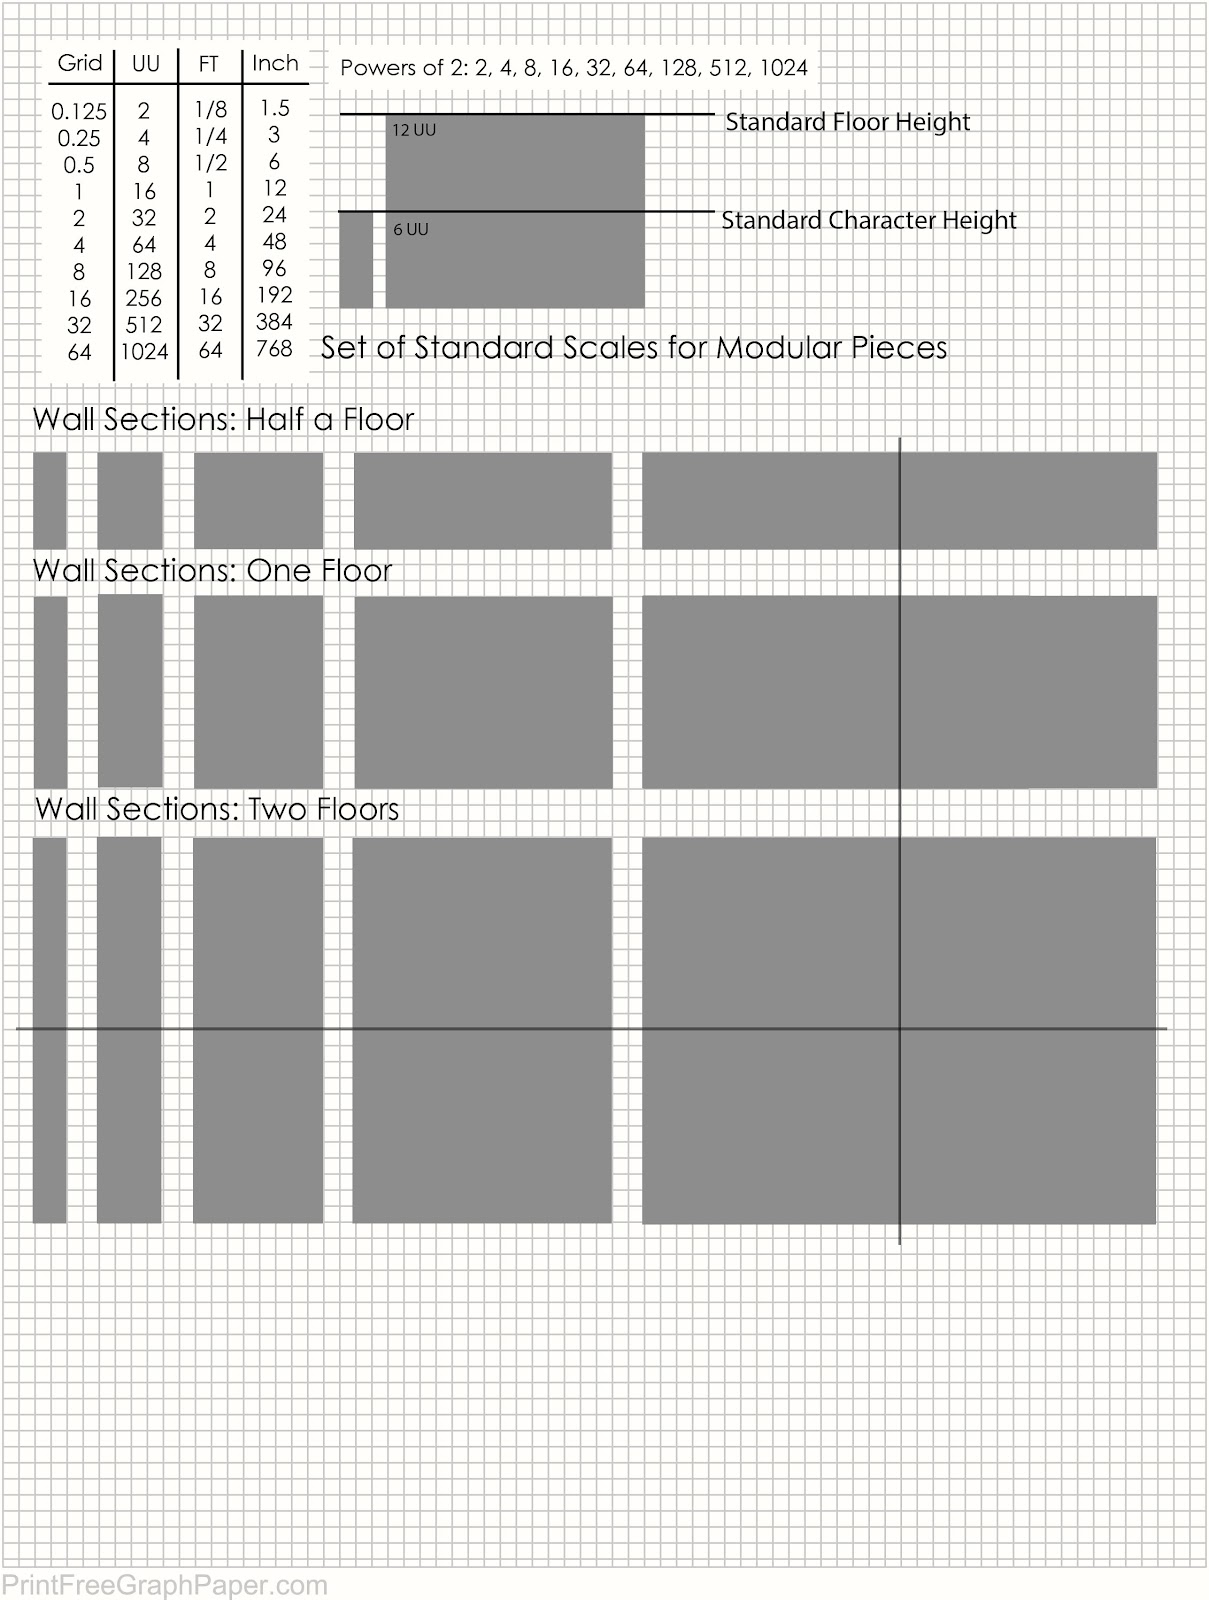
I also went over some of my notes from my research on modular building and scale for UDK and updated my standard scale guide for my level.  I'm not always reliable when it comes to math and calculating numbers, so to help me save time and move a little quicker, I realized having a chart of general sizes would really be beneficial.

Of course, because I have yet to actually test things out in the engine this is going to be another one of those things that may very well be subject to change. 

Time Tracking: 
5h 00m: Conceptual Modeling
1h 00m: Conceptual Modeling

1h 15m: Conceptual Modeling
0h 15m: Rendering
1h 00m: Trello
0h 45m: Production To-Do List
3h 00m: Conceptual Modeling
1h 00m: File Organization
1h 00m: Abstract Write-up
0h 23m: Scale Guide Up-date
1h 00m: Blog Write-up

Total: 20h 38m