Showing posts with label environment. Show all posts

Friday, March 1, 2013

The Final Outcome

Thesis is finally over and it feels so good to be done! I know everyone is eager to see to the final product, but I'm still tweaking the actual fly through of my scene. I do however, have some wonderful stills of various parts of the train station as it currently is in UDK.

 The Train Tracks with McQuinn above and the giant doors of the Gatehouse ahead.
 A close up of McQuinn's Sign.
 An overhead shot of what the train station looks like.

 A lovely look at the Rasheem Lux and Valheim Station.
 Looking out from the tunnel below Valheim Station.
 The Gatehouse from the ground above the train tracks.
And finally a great shot of the Rasheem Lux storefront and appartments.

There are definitely some things I want to adjust/polish, but I am extremely pleased with how much I was able to get done over the last 22 weeks.  There were a lot of bumps along the way, but I really couldn't have hoped for a better result. I'm hoping to have the fly through and modular breakdown videos up soon!

Wednesday, December 12, 2012

Winter Quarter Week 2: Lighting and Cinematics


Rabil Thesis WIP 1 from Madeleine Rabil on Vimeo.

Time Tracking:
0h 30 min: Planning

1h 00 min: UDK Tutorials
2h 09 min: Cinematic Set Up
1h 00 min: Lighting Tutorial
1h 00 min: Planning
2h 00 min: Lighting/Importing in UDK
0h 48 min: Rendering
2h 12 min: Optimizing Light Maps
1h 00 min: Meeting with Thesis Assists
0h 49 min: Adjusting Lights

1h 11 min: Rendering Lights in UDK
1h 00 min: Adjustments in UDK
1h 00 min: Organization
1h 00 min: Fixing Issues
1h 30 min: Fixing z-fighting/exporting and reimporting meshes
0h 30 min: setting up cinematic in AE


Tuesday, October 30, 2012

Fall Week 8- Last Week of Modeling

I got a lot done this week in terms of finishing up all the main models for the scene. Added in all the doors and different trims, and got the ground pieces separated out. Trying to decide how I wanted to do the ground took me more time than I would've liked and kind of felt like I was going around in circles for a lot of it. I'm still a little on the fence about it, but I'm hoping that putting it in UDK this week will help me figure out how to do it.
Once I got everything I absolutely needed modeled, I had a little bit of time left over to add in some small assets. I'm really hoping that I can get a Thesis assist next quarter to make some more for me while I work on the textures because the scene just feels really bare right now. Part of that is due to the fact that there aren't any textures, but I'd really like to get a lot of smaller simpler assets done for the scene to help it feel more finished.


I just did some quick AO passes.  I know some of the details I have now will need to be baked down to normals which hopefully wont be too difficult since I still have copies of models when they were lower res. But that is something that will have to wait until next quarter since I will be focusing on setting up the scene in UDK, UVs, and my presentation for finals week for the rest of fall. Hopefully the import and set up in UDK will go smoothly as I took a little long than I initially wanted on the modeling. I'm also hoping to have everything for my final done early so I can knock out as many UVs as possible before the end of the quarter.

Luckily I am very familiar with the UV process (both new and old methods) so I'm not worried about that, it's just getting them all done as efficiently and as quickly as possible. The nice thing about having modular pieces is that I only have to UV each part once and then get to duplicate it as many times as I need instead of having to do the whole building in one set.

Time Tracking:
2h 00m Modeling
4h 00m Modeling
5h 00m Modeling
7h 00m Modeling
2h 30m Modeling
0h 45m Rendering
0h 25m Blog Post

21h 40m Total

Tuesday, October 23, 2012

Fall Week 7- Intensive Modeling

Once again I spent the week modeling. I added in a lot more of the details in terms of what I need for the profiles of the various pieces, and overall the scene feels a lot more complete.
I went ahead and took a little bit of time to throw in a quick sun and sky for some nicer renders for this week instead of just using screen shots like I have been. The shadows could be improved, but since my goal is put this in UDK, spending time setting up nice renders in maya, especially this early on, isn't really a good use of my time.
I added trim as well as the details for the side doors and window vents. I'd say I'm about 80-90% done with the base for the train station. There's a lot more pipes I want to work on adding in, but I'm going to be making a small modular set for that. I still need to model the doors.
I added some more architectural detail to the Lux and made some changes to the windows. I'm not sure if all the detail is necessary, but because I still have the old versions of the model it will be easy to scale back a bit if I need to. Aside from the signs and extra decorations I'd like to add, and finishing the doors and store front windows the models for the Lux are pretty much done.
I didn't have too much to change for McQuinn, and other than the doors and any extra decorations it is also done. I played around with making some scrap metal and stuff as covering for closed shops, but I want to wait a little bit before I really delve into making that kind of stuff. Mostly because I need to make sure I plan it carefully enough that I can use it in various places through out the scene. One of the major points of modularity is to reduce the number of unique assets so I want to make sure the boards and other scraps I make can be used effectively.


Of all the buildings, Tepton went through the most changes. I didn't like the feeling I was getting from the design of the side doorways so I changed facade quite a bit. I also modeled the details in the actual gates. If you look below you'll see (aside from the bad shadows I mentioned earlier) that I added in the train tracks as well as a special transitional piece for when the train passes through the actual gate house.

I'm really hoping to push through the last phases of the silhouette pass modeling this week so that I can start putting the level together in UDK and then switch gears to UVing in prepartion for next quarter.

Time Tracking:
0h 30m Gnoman Disk
1h 30m Organization
2h 00m Modeling
6h 00m Modeling
2h 00m Modeling
5h 00m Modeling
2h 00m Modeling
1h 00m Rendering and Set-up
0h 30m Blog

20h 30m Total

Tuesday, October 16, 2012

Fall Week 6: Modeling

Not much to talk about this week, spent the whole time modeling and making adjustments. Got a start on Tepton Gate and continued working on the rest of the buildings.


Time Tracking:
4h 30m Silhouette pass
8h 00m Silhouette pass

20h 30m Total

Sunday, September 16, 2012

Fall Week 2: Conceptualizing, Planning and Research

Concepts:

The majority of my time this week was spent on continuing to conceptualize the different buildings in the scene. Trying to draw and map them out was taking too long since I just don't have enough experience drawing architecture in general, so I decided to just do quick block out models of them instead. It ended up going way faster than trying to draw and gave me a really good sense of the form and space for the different buildings. 

Conceptual block out of the train station.
Conceptual block out of building 3.
Documentation:

I organized my files into a nice little folder set-up so that I can hopefully keep everything neat. Didn't take too much time, but I have had to deal with disorganized project folders before, and the time and frustration is just not worth it so I wanted to make sure I got this done and soon.

I also spent a good bit of time working on the documentation and actual production to-do list. I won't post the whole list, but here's a snippet of what I did:

Production:
UDK:
Test out different Heights for Doors and Windows in UDK
Import Base Meshes to UDK
Block out scene in UDK with Base Meshes
Import Collision Meshes
Test Collision Meshes
Replace Base Meshes with Final Meshes in UDK
Regularly test Proportions and models in UDK
Set up Lighting
Import Textures to UDK
Set up Materials in UDK
Test Materials in UDK
                Set Up Animations in UDK
                                -Train Matinee
                Beta Comments
Assets:
                Train Station
                                Base Meshes
                                Uv’s
                                Textures:
                                                Diffuse
                                                Specular
                                                Normal
                                                AO
                                                Transparency (if needed)
                                Collision Mesh
                                Retopologized meshes (if needed)
                                Final Mesh
                                Rendering:
Asset Break down Sheet
                                                Wireframes
                                                Still Render in UDK
Final Products:
                Capture Footage of UDK Walkthrough of Level
                Still Renders in UDK
                Asset Break down Sheets
                Wireframe Renders
                Process Break-Down Video
                Design Doc

It's still very far from being perfect, but a lot of what I have left to determine will be based on the results of my research so I can't plan it out until that is done.  I don't want to do too much planning before my research is done because a lot of the workflows and over processes I will use are going to be based on what I learn from it. In fact, I began researching today and it is already obvious that I will have to make some major adjustments to the to-do list I put together earlier this week. 

I also managed to write-up a preliminary version of the abstract for the time being. 

Abstract

The purpose of this thesis project is to create a Stand-Alone Game Environment  using modular building techniques that meet and or exceed current industry standard. As a Stand-Alone Game Environment, the final product does not need to include any playable mechanics or require participation from the player. Rather, it is created with the purpose of being an explorable environment that showcases the overall art and assets that make up the environment itself.
The environment itself will be of a worn down train station and boarding zone set in the heart of a once buzzing commerce district of a now aging city. The barely functioning train station is surrounded by decaying apartments and barely-in-business shops.  The shops and apartments are separated by the train tracks which lead from a tunnel into the train station itself.  Above the tracks just outside of the train station is a bridge that civilians may use to cross over the tracks safely from one side to another. The lower level by the tracks and the upper level bridge are connected by special elevators that civilians may use to traverse the scene.
Other visual elements that the environment will feature are detailed textures with normal, diffuse, specular, glow/ambient, and reflection maps. Models will be low poly to allow for optimization in engine, and in some cases sculpted and retopologized. Some interactive elements may include an elevator taking the player to different sections of the map and possibly a matinee Sequence involving a train coming into or leaving the station.
Overall players can expect to experience a well thought out and stylized custom Game Environment that takes place in a unique urban setting.

I expect it to change over time as I flesh out more and more of the design doc and well as continue my research.

Research:
I spent a little bit of time playing around with Trello.com's project planning tools, but in the end I found that it lacked a lot of features that I just felt like without them it wouldn't really be an effective tool for me. I didn't like how you couldn't have a main board showing all your other boards. You could lable them all to be under the same project, but not being able to seem them all at once was a major problem if you wanted to break down the areas of your project into seperate boards. I tried to do something similar in a board where I just broken down the project into notes, but you are extremely limited in how much you can do with a note. I wanted to be able to take a note and break it down into different sections, but again there really just wasn't a way to do it. I spent about an hour trying to figure out how I could organize it so that it would work, before I decided it just wasn't going to be something I could use effectively.

I watched an incredibly helpful video that my professor showed me on the Autodesk Area website by Sandra Tournmille called, "Insider Tips and Tricks for Creating Game Environment Assets." I highly recommend it to anyone who is interested in creating game environments and assets. I'm going to be replanning my overall workflow for this project now because of it.

What was nice about the video was that it was all concepts I had heard of before, but she really goes through and explains what they mean, why they are, and where they play into the production process. Although it was more of a walkthrough to the concepts than an actual tutorial, I found it was really helpful because when watching actual tutorials about the same stuff they don't usually take the time to break things down and explain what they are doing things that way when in relation to everything else that would be going on in a studio. A lot of times in a tutorial, you'll hear "this is important, so do it this way," while the way Sandra does it is, "this is important because the person you pass it onto needs to be able to figure out this from it- which is why it is done this way."

I took about 6 pages of notes from the video, but even so I expect I will be re-watching a lot of it because it really just is that helpful.

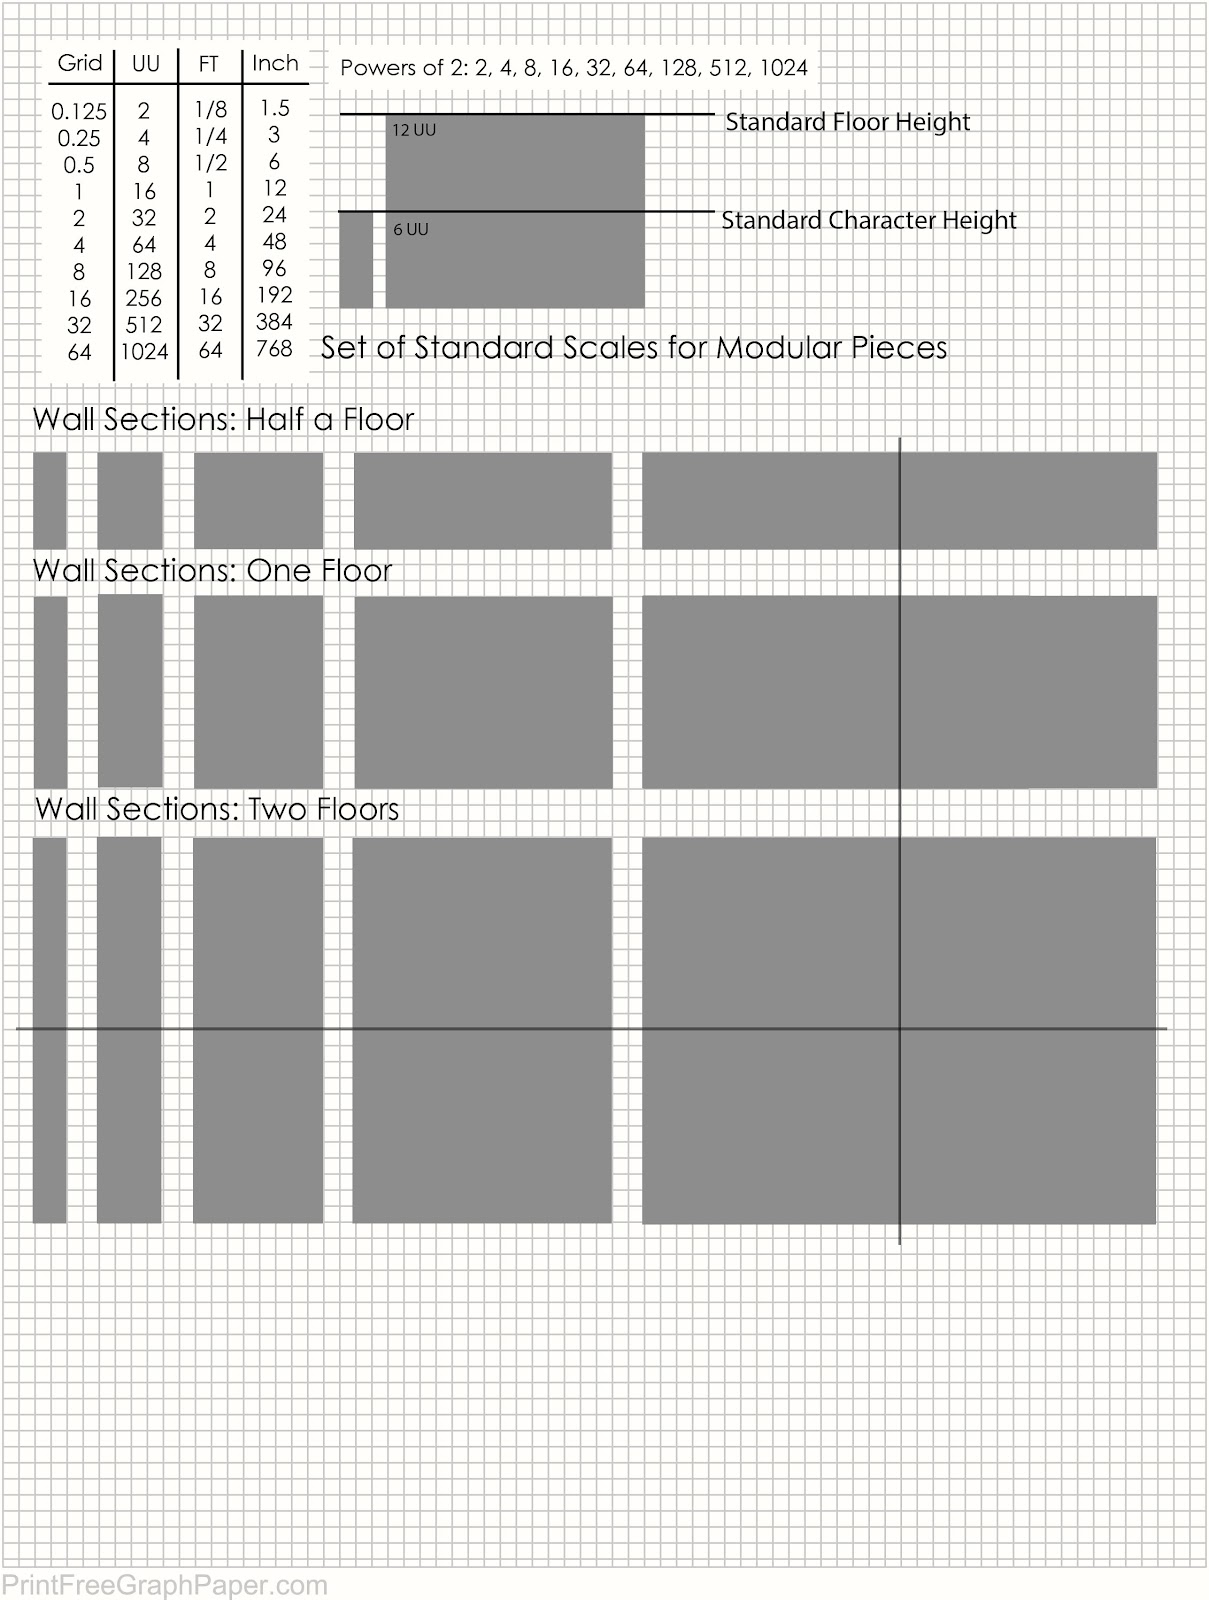
I also went over some of my notes from my research on modular building and scale for UDK and updated my standard scale guide for my level.  I'm not always reliable when it comes to math and calculating numbers, so to help me save time and move a little quicker, I realized having a chart of general sizes would really be beneficial.

Of course, because I have yet to actually test things out in the engine this is going to be another one of those things that may very well be subject to change. 

Time Tracking: 
5h 00m: Conceptual Modeling
1h 00m: Conceptual Modeling

1h 15m: Conceptual Modeling
0h 15m: Rendering
1h 00m: Trello
0h 45m: Production To-Do List
3h 00m: Conceptual Modeling
1h 00m: File Organization
1h 00m: Abstract Write-up
0h 23m: Scale Guide Up-date
1h 00m: Blog Write-up

Total: 20h 38m

Saturday, September 8, 2012

Fall Week 1: Conceptualizing and Organizing

I've been working relatively non-stop on my thesis all week. And I've managed to get quite a lot done. I'm going to try and break it down into general sections in terms of what part of the preproduction everything falls under. I'm a big believer in the time saving power of good documentation so I'm doing everything I can to make sure I do a thorough job.

Preproduction To-Do List:
This is my general to-do list in terms of everything I need to get done for my preproduction.
-->

-->
Design Doc:
                  Abstract
                  Full/Precise Project Description
    Start Bibliography
                  Gather Links for sites already used for research over the summer
     Organize Images into Style Sheet
                  Organize Images into Inspiration Sheet
                  Wants and Needs Lists
                  Production Timeline/Gantt Chart
File Organization
Come up with Naming Convention
Concepts:
Train Station/ Building 2 Concept Art
Building 3 Concept Art
Building 4 Concept Art
Asset List
Texture List
Everything List
To-Scale-Top-Down-Map
To-Scale Asset Break Down Sheets:
                  Train Station
                  Building 2
                  Building 3
                  Building 4
                  Bridge
                  Train Tracks
                  Train Tunnel
                  Elevators
Research:
Research Modular Building
Research Mudbox and Normal Mapping Environment assets                 
Test out Mudbox and Normal Mapping on a small asset
Research Texturing workflows and techniques for Games
Test out Texturing workflows on a small asset
Find notes on UDK
Practice Workflow from Maya to UDK
Research Materials in UDK
Practice making a Material in UDK
Block out Scene in Maya

Design Doc:
Here's what I have so far in terms of the design doc and just general project guidelines. Nothing is written in stone obviously, but it's a start.

Stand-Alone Game Environment
A Stand-Alone Game Environment may not include any playable mechanics and may not require player participation. Stand-alone game environments may created for a portfolio piece, a beauty scene or simply an environment to explore and showcase.

Game Engine
Unreal Engine and Unreal Development Kit

Idea Description
A worn down train station and boarding zone set in the heart of a once buzzing commerce district of a now aging city. The barely functioning train station is surrounded by decaying apartments and barely-in-business shops.  The shops and appartments are separated by the train tracks which lead from a tunnel into the train station itself.  Above the tracks just outside of the train station is a bridge that civialians may use to cross over the tracks safely from one side to another. The lower level by the tracks and the upper level bridge are connected by special stairwell buildings on either side. Building materials should be metals, bricks, and concrete.

Environment Setting
A general location where the environment takes place.

City/Urban
Metropolitan

Location
Subway/Metro/Train boarding point in the heart of the busy city district, a main point for transportation.
Train Tracks
Apartments
Storefronts

Themes
Metropolitan
Traffic
Federal Style turned Technological
Worn-Down
Mobility
Commerce

Project Purpose
What is the Reason I am Creating this Environment?
Develop an industry standard stand-alone game environment using UDK, Maya, Photoshop, and Z-Brush that is set in an Urban and grungy train station with a metropolitan city setting for my senior thesis.

What I want to learn/Improve
Modular Building techniques for creating game environments
Modeling workflow for game asset and environment creation
Texturing and surfacing techniques for games using Photoshop and Z-brush
Development process for game environments and props
Hard surface Modeling

What I want the player to Experience
Custom Game Environment
Unique Urban Setting
Stylized setting


Inspiration:
I spent a lot of time searching through images over the summer looking for something that would inspire me interms of the type of style I wanted to use for my thesis and just in general for creating ideas. The problem is I am so used to conceptualizing on my own that I had already formed an idea of the style I wanted in my head, but I was having difficulty putting it down onto paper. Mostly because I knew how I wanted to stylize it, but I didn't know what I wanted my scene to be. 
After running around in circles for what seemed like weeks, I stumbled apon the work of Oscar Cafaro and in particular his environment work that he posted here (the 6th image down is the one that particularly struck me).  Not only did it have the exact feel I want to go for, but it immediately caused me to visualize a scene for my thesis. This was the first big break through I had in terms of figuring out the visual development for my scene and I consider it the biggest source of inspiration so far.

I also spent quite a bit of time looking up various train stations to fit the concept that was forming in my head. In the end I found Hauptbanhof, which was almost a perfect fit.

Style:
Obviously, I don't want to copy off of Oscar Cafaro, so I began doing some sketches of my own to help me develop my own visual style. I even blocked an entire environment to help me get the feeling of the types of forms I want to include. 


(Note: The bridge in the render on the left is an old version, I decided that visually it was too big and ended up changing it quite a bit)
I eventually determined that my original scene was far too over scoped in terms of the amount of time  have for this project, but I believe that keeping it as a reference is still a good use for it.

I ended up changing the style towards something a little more industrial(in my mind at least), but combined with some of the same futuristic looking features. 

It took me a while to put my finger on a good example exactly what I was looking for, when I realized I was drawng from my favorite video game with out even knowing it. My favorite game is Final Fantasy VII, I've been in love with it ever since my brother's brought it home back in 1997. I did a quick search around the web and found a fantastic site with tons of pictures of the in game environment.


Color Palette: 
This is just my rough color palette. I've been adding to and adjusting the colors when needed.


Concepts:
And now for my favorite part of the preproduction process, concepts!
I've been building ideas for small assets over time.  I went ahead and quickly sketched a few of them out.
 I did a quick concept to put at the top of the blog, but also to help me sketch out some ideas for the buildings.

Then I began working on a more detailed concept drawing of the train station, bridge, and building 2 to help me in terms of figuring out my assets. Here's what I have so far:
Unfortunately I'm hoping to finish blocking out the remaining details tomorrow so that I can start coloring it.

Time Tracking:
That's about the majority of the work I've gotten done so far this week. I'm require for class to keep track of the time I am spending on my thesis so I'll end each blog with the hours.

3h 00m:   Image Search
2h 00m:   Concept Art
1h 00m:   Class
0h 30m:   Image Search
1h 00m:   Concept Art
0h 00m:   FFVII Image collection
1h 30m:   Blog Banner/ Concept Art
1h 00m:   Blog Set up
2h 00m:   Documentation and write-up
4h 30m:   Concept Art
0h 16m:   Scanning Sketches
1h 00m:   Small Asset Sketches
1h 00m:   To-do list type up
1h 45m:   Blog write up

Total: 21h 01m